Introduction
All 3D shapes are made up from a number of polygons, normally triangles.
Triangles are used because they are the most efficient polygons to draw, handle mathematically and because every other kind type of polyogon can be build from triangles.
So, if you wanted to draw a square, it is more efficient to draw two triangles next to each other rather than trying to draw one square.
This tutorial will show you how to deal with one of the building blocks of 3D graphics: A Triangular polygon.(!)
You can download the full source code the "Download Source" at the end of this page.
Vertices
What is a vertex?
Vertices are points in 3D space.
For example, a triangle has three vertices and a square has four vertices.
You can describe a triangle by specifying where its three vertices are.
To do this you need to know about coordinates.
2D Cartesian Coordinate System
First of all, "Cartesian" just means that the axes in this coordinate system are perpendicular to eachother.
Below are two diagrams showing how the 2D Cartesian coordinate system works.
In the examples above, we have an x-axis and a y-axis.
Along each of these axis are numbers starting from zero (called the origin) and increasing the further along the axis you go.
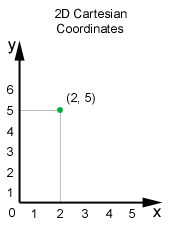
To specify a single point, all you need is an x value and a y value (see fig 2.1).
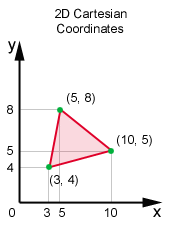
From this it follows, that to represent a triangle you need three of these points that are joined together, each with an x value and a y value (fig 2.2).
Notice that when we write a coordinate, it is always in the form: (x, y).
3D Cartesian Coordinate System
Below are two diagrams showing how the left-handed 3D Cartesian coordinate system works.
Just as with the 2D coordinate system we have an x-axis and a y-axis.
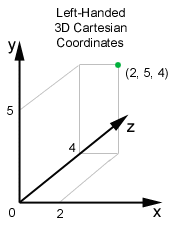
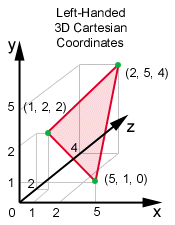
When we are dealing with 3D shapes and points we need an extra dimension - the z-axis.
This axis works in the same way with numbers starting from zero at the origin and increasing the further along the axis you go.
Now, with these three axis we can specify any point in 3D space.
Notice that when we write coordinates in 3D space they are always in the form: (x, y, z).
3D Primitives
So what is a 3D primitive?
Well, a 3D primitive is a collection of vertices that make up a 3D shape.
There are six 3D primitives in Direct3D, which you can use these primitives to draw your 3D shapes.
Below are diagrams showing examples of these primitives:
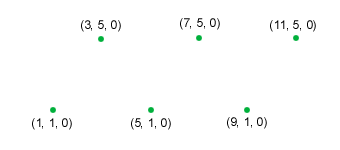 |
| Point list |
 |
| Line list |
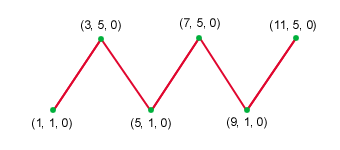 |
| Line strip |
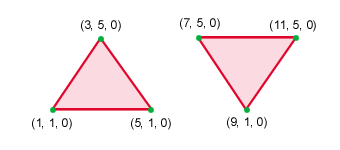 |
| Triangle list |
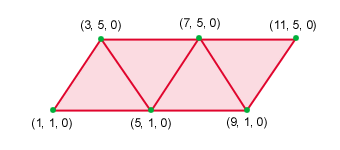 |
| Triangle strip |
Flexible Vertex Format (FVF)
A Flexible Vertex Format or FVF is a Direct3D format for describing attributes.
We've already seen three attributes: x value, y value and z value.
There are many other attributes that we can specify for a vertex, such as, color and shininess.
Using FVFs we can configure which attributes we want to specify for a vertex, such as color and lighting.
When you specify a polygon in Direct3D, the polygon can be drawed (filled) based on the attributes of the vertices.
The fill of the polygon is interpolated (blended) between its vertices.
In our example below, you will see that the three vertices of our polygon are all different colors: red, green and blue.
These colors are blended together across the triangle.
Vertex Buffers
A Vertex Buffer is a memory buffer for storing vertices.
A vertex buffer can store vertices of any format.
Once your vertices are stored in a vertex buffer you can perform operations such as: rendering, transforming and clipping.
Colors
To represent colors in Direct X, we use the D3DCOLOR_XRGB macro.
There are three parameters: Red, Green and Blue.
These parameters are integer values between 0 and 255.
By specifying different amounts of red, green and blue values you can make any color you need.
For example:
|
D3DCOLOR_XRGB(0, 0, 0) is black (no color)
D3DCOLOR_XRGB(255, 255, 255) is white (full color)
D3DCOLOR_XRGB(0, 255, 0) is bright green (no red, full green, no blue)
D3DCOLOR_XRGB(100, 20, 100) is dark purple (100 red, 20 green, 100 blue)
|
Here is the code for this tutorial. It's just the same as the code from the first tutorial, except for a few modifications:
|